Saturday, December 17, 2011

Christmas Dinner Place Cards/ Take Home Ornaments

Twenty-seven people over for dinner...that is a lot of people!! To help everyone find a comfy place to sit, I made ornaments that not only serve as place cards but as something for everyone to take home to remember this festive occasion. You just need some course, clear glitter, old books or newspapers, twine, Gloss Mod Podge and some clear ornaments and your are set!


Pin It


Merry Christmas!!

Sunday, December 11, 2011

Fresh Christmas Garland

Since my husband and I are finally living back near our hometown, we decided to host Christmas Eve dinner. This will be the first time hosting a big holiday event since we have been married and we are so very excited! 

I love decorating with fresh garland. I love the smell and look of it. It gives such a welcoming feel.

Ahhh...Home.

Pin It


The Garland features my Handmade Ornaments from the previous post.

Saturday, December 10, 2011

Handmade Ornaments with Mod Podge

This is one of my favorite times of the year as I am sure it is most of yours as well. I love the old classic Christmas songs and the hot cocoa and all the lights! This season makes you feel like a giddy little kid again. =) Here are a few ornaments I made to add to my front door garland this year. Super easy to make but a bit time consuming. Directions are at the bottom.


Pin It


Pin It


I did these 2 different ways.
On the first ornament, I used an old book and tore the pages into pieces and glued them on with Mod Podge Matte.

OR

You can stamp images all over paper and then tear them into pieces and glue them on which is what I did for the snowflakes and Music note ornaments.

It is as simple as that.

Merry Christmas!

Sunday, October 30, 2011

Happy Halloween!

These were fun little painted glittered monogram pumpkins. Easy to make and look great outside! I hope everyone has a safe and fun Halloween!!

Thursday, October 27, 2011

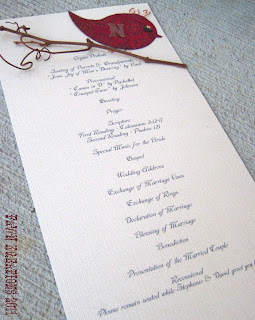
Bird & Twig Wedding Programs

Here is a set of wedding programs I made for a beautiful and talented Bride. She had fall colors including, reds, deep blues, coppers and golds. 

This program features copper wiring for the bird's feet and head feathers and gold embossing on the body of the bird. I chose a deep blue color for the font and the twig just added a touch of fall.

Congratulations to you both! <3


Pin It


Custom orders available

Saturday, October 15, 2011

Bridal Slipper Tutorial

This is a fairly easy project to do so let's get started!

You will need:

Pair of shoes
Beads, Jewels, etc...of your choice
Felt
scissors
Glue gun/Glue sticks
E600 Glue


Arrange your assortment of beads into the design you want.

Cut a piece of felt to fit this shape and hot glue your beads to the felt.
 

You will then use the E600 glue to adhere them to the shoes
{I let mine set/dry for 12 hours just to be sure}.
 

When they are dry, you have a stylish pair of shoes to wear out!
Pin It


Custom orders available

Thursday, October 13, 2011

Willy Wonka-like Mushroom Decor Tutorial

This is sort-of, kind-of a small break from all the wedding decor I have been posting. This was still for the wedding but it was for the cutely themed candy table. As you may remember from the place card post, all of the tables had a movie instead of the usual table number. The candy table was no exception and, as you may have guessed from the title of this post, the table was "Willy Wonka and the Chocolate Factory" {only changed slightly which will be shown in a later post}. 

The Bride wanted mushrooms and loli-pops and large wrapped candies. So, I did just that. 
 Here are the mushrooms and how to make them.


You will need the supplies below:
Stufffing
Foam Disc
Foam Cone
Fabric
Glue Gun/Sticks
Piece of paper
Spray paint or regular paint

Spray paint or hand paint the foam cones and let dry.

Cut out a circle that is about an inch smaller than your foam disc.

Cut a hole in the center of your paper and then hollow out the center of your foam disc. {Make sure the hole in your paper lines up with the hole in your foam disc}.
 Set your paper aside

Place your "stuffing" between your fabric and the foam disc.

Begin gluing your fabric around the foam disc just like in the pic below.

I ended up cutting the excess material off after making sure I had enough length to glue to the disc.
You can shape the stuffing with your hand inside the open ends until you get the look you are going for. 

Your mushroom should look similar to this on the bottom when it is all glued and secure.

Glue the piece of paper after lining up the holes. This will cover the bottom and make it look a bit cleaner. {Not that anyone sees this}.

Glue the ends of the cones into the hole at the bottom of the mushroom.

TA-DA!!

Monday, October 10, 2011

Infant Flower Girl Headband

I made this for the youngest flower girl. The giant blossom was so cute on her little head. She was pulled down the aisle in a cute little wagon. Such a doll! 


Custom orders available

Sunday, October 9, 2011

Flower Girl Halos

These were for the 2 little, adorable flower girls. Wait until you see their dresses that they wore. They looked like little forest fairies.


Custom orders available

Saturday, October 8, 2011

Bridesmaids Hair Clips/Headband

Here are the hair accessories I made for the bridesmaids to wear. They include 1 headband and 9 hair clips. They looked so elegant in all the girls hair but then again, I might be a little biased. =)


Pin It


Custom orders available

Friday, October 7, 2011

Flower Girl Baskets

The Flower Girl dresses were just so cute that the Bride had wanted something simple, yet elegant for their baskets. The small rosettes match the halos the little cutie pies wore. The long ribbons hanging from both were so whimsical and precious.


Pin It


Custom orders available!

Wednesday, October 5, 2011

Fabric Flower Pomanders

 It is popular to hang pomanders of fresh flowers down the aisle of a wedding ceremony. However, this particular bride was going for something a little different. I made her 8 pomanders each with about 25 handmade, fabric flowers in 5 different styles. That is 125 flowers total!! They were a lot of work, but I think they came out beautifully!


Pin It


Custom orders available.

Tuesday, October 4, 2011

Bride's Slippers

What Bride doesn't like a little bling? The Bride bought a pair of plain slippers in hopes of wearing them on her special day but felt they were missing...a whole lot! To match her vintage theme, I added pretty rhinestones atop a fabric rosette. She had aisle worthy toes that complimented her beautiful day!


Tutorial to follow!


Custom orders available!

Friday, September 30, 2011

Redesigned Wedding Guest Book

This guest book came to me as a plain, white book with "Guest" embossed in gold. To give it a richer look, I wrapped it in satin and adorned it with pearls, rhinestones, and champagne rosettes. I thought it would be a challenge but it was rather simple to do. I also placed one of their engagement pics on the inside {not pictured} with the date. Now her and her new husband will have a keepsake that will forever remind them of all the people who shared in their special day.


Custom orders available!

Thursday, September 29, 2011

"Admit One" Place Cards

The Bride and Groom have a theater in their basement because they LOVE, LOVE, LOVE movies. So, what better way than to use movie titles for table numbers instead of the traditional table numbers?!?!

The guests "starred" in the movie where they were sitting at and Each table had a small poster of the movie {shown in a later post} on the table so they could easily locate them. It was a really cool idea and it looked amazing!


{The letters on the back indicated the meal/s the guests chose}

Pin It


Custom orders available!

Tuesday, September 27, 2011

Gathered Ring Bearer Pillow with Large Blossom

The Bride gave me a ring bearer pillow that was given to her. She wanted one that matched her colors and one that would fit in with the style of her wedding. This was what I came up with!


This is what it looked like 
BEFORE.