
Here is how to make a Tassel.
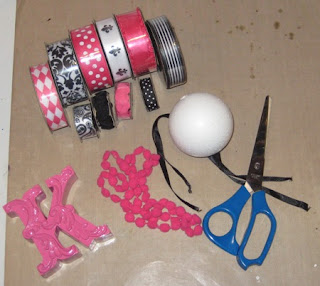
You will need:
Ribbon of your choice
Styrofoam Ball size of your choice (Mine are 2 1/2")
Scissors
Acrylic Paint of your choice
Paint Brush
Hot glue gun/sticks
1 Toothpick
Tulle
Needle & Thread to match your tulle
A topper of your choice
Drill with small bit
Tape measurer or a ruler
Pencil
Painters Tape
Lighter, candle or embossing gun
Step 1: Cut the Styrofoam ball in half.

Step 2: Place tooth pick in center of Styrofoam, on the flat side. Paint the flat side first and then hold toothpick while you paint the top side.


Step 3: While the paint is drying, cut short, medium & long strips of ribbon. (About 22 strips for each size)

You can cut some or all of the ends to add a little extra style.

Step 4: Start gluing the the ends of the long strips onto the Styrofoam after the paint has dried.

Step 5: You will then need to glue the strip down the side of the Styrofoam as shown in the picture below.

Work your way around until all of the long strips have been glued.


Step 5: Do the same with the medium sized strips but make sure that you DON'T glue them down the side like you did for the large strips. Just glue the ends.
Step 6: Glue the small sized strips in half and work your way around the top portion of the Styrofoam like in the picture below.


Step 7: Grab a few strips of tulle and sew a running stitch down one side. Gather it so that it looks like the picture below.

.
Step 8: Glue the sides together so that the tulle takes on a circular shape. (The Glue will be covered by your topper).

Step 9: Glue the tulle to the top.

Step 10: Place a piece of painters tape on your topper. Measure the center of your topper and make a dot with a pencil.

Step 11: Line up your ruler in the other direction with the dot you just made. Make another dot. This dot will be your center point.
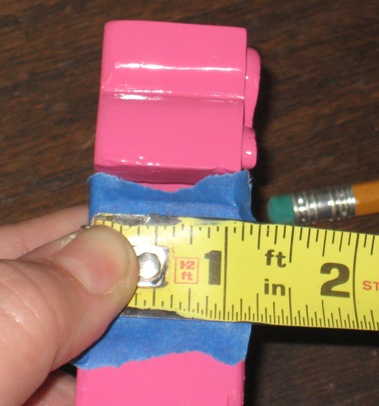
Step 12: Drill a hole at your center point.

Step 13: Thread some ribbon through the hole.

Step 14: Place a pencil through the ribbon loops to keep it from pulling through while you even the ends and tie the knots.

Step 15: Cut off the ends of the frayed ribbon and singe the ends together with a flame or embossing gun.

Step 16: Glue your topper onto the tulle and...
VIOLA!

Let me know if you have any questions. I am happy to help.
Have fun!


